


(Original post date: 30 December 2021)
Going through your web browser bookmarks is a lot like cleaning out your decades-old wardrobe and strolling down memory lane. While hanging on to a few classics is acceptable (and possibly trendy), hanging on to everything becomes an overwhelming fabric pile.
The same holds for your browser bookmarks. Fail to organize your bookmarks (webpages) as you fill up folders and, over time, your bookmark collection can become an unmanageable nightmare that makes finding that one bookmark from years ago challenging. Managing bookmarks makes them easier to search and navigate. Here’s how to tame your bookmarks and how OneLaunch can help.
Of course, if you’re new to web browser bookmarks, the easiest way to manage them is to start off with a little behind-the-scenes work. But for this post, we’re assuming you already have a collection of bookmarks, and you need some guidance to regain control.
First, Backup Your Bookmarks
Before purging your bookmarks, back them up somewhere safe, like Google Drive, Microsoft OneDrive, or Dropbox. Saving your current bookmarks ensures you can recover any deleted ones if you need them again.

The steps to backup your bookmarks or favorites (for Microsoft Edge users) are fairly straightforward, regardless of whether you use Chrome or alternatives to Chrome, including Chromium, which is what OneLaunch is built on:
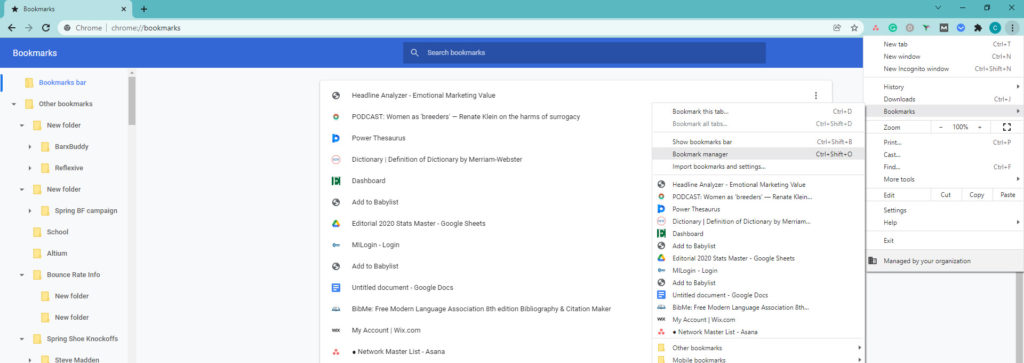
- Google Chrome: Click menu (three dots in upper-right corner) > Bookmarks and lists > Bookmark Manager. Tap the lower menu within the Bookmark Manager page and select Export bookmarks. Choose where to export your bookmarks, name the file and save.
- Microsoft Edge: Click the star icon with three lines > three-dot menu in Favorites menu > Export favorites. Select where you want to export your bookmarks, name the file and save.
- Apple Safari: Choose File > Export > Bookmarks. Select a location and save your file.
- Mozilla Firefox: Click the hamburger menu (three stacked lines) > Bookmarks > Manage Bookmarks. Select Import and Backup from the toolbar in the Library window > Export Bookmarks to HTML. Choose a location to save your file and save.
Next, Upload Your Bookmarks to OneLaunch
A quick tap on the O icon in the upper-left corner of your OneLaunch dock opens your dashboard. Click the plus sign next to Bookmarks to add a bookmark or folder to your collection. Reminder: You can add bookmarks manually via your OneLaunch Chromium browser via the three-dot settings menu. If you have a considerable collection of bookmarks, tap the three-dot menu on the right to view them all. Select any bookmark, and OneLaunch will open the page for you. To access a bookmark inside a folder, you must tap the folder then the desired page.
A cool feature we built into OneLaunch is a seamless sync between the OneLaunch dashboard and the OneLaunch Chromium browser. When you add bookmarks in one area, they’ll automatically update in the other.
Last, Declutter and Organize Your Bookmarks
Now that you have saved a copy of your bookmarks, you can go in and begin deleting duplicates, those you no longer need or ones that are now dead or redirected. Once in your Bookmarks Manager (Google Chrome and OneLaunch) or Favorites (Microsoft Edge), you can right-click any bookmark or folder and delete.
Apple users control-click a bookmark, then delete. Mozilla users select bookmark in Library > Organize > Delete. If you sync your Chrome browser data, changes made on your PC or Mac will also reflect on your laptop or mobile device.
Answers to FAQs About Bookmarks/Pinned Favorites
What’s the best way to organize my bookmarks?
Yeah, that’s a great question, and the answer is really dependent on how you think. You could keep it simple and organize them alphabetically. Or, you could use some sort of bucketing system, putting similar bookmarks together — shopping, banking, health, social media, etc.
Use folders to organize your decluttered bookmarks. Depending on how granular you wish to categorize your bookmarks, you can elect to create a hierarchy of folders with nesting folders in each. Organizing your bookmarks based on their relationship may help you find them later. For example: Put web pages related to news in one folder and work-related pages into another, and so on. You can further break them down into subcategories and into their folders. Now that you have decluttered and organized your bookmarks, it’s time for you to maintain them.
How do I delete bookmarks?
In Google Chrome, there are a couple of ways to delete bookmarks. Any time you are on the pinned webpage, simply click the colored star in the address bar, then tap Remove. Alternatively, you can go into the Bookmark Manager, select the folder or bookmark you wish to delete, right-click, delete. Or, select folder or bookmark, tap the three-dot menu, click delete. If you’re working in Windows 11, you’ll notice a pop-up with the folder/webpage you just deleted, along with an undo option that will return your item right back where it was.
Can I access my bookmarked pages when I’m offline?
Yes, you can access your bookmarked pages anytime you’re offline, providing you set them up for offline viewing. To save favorites for offline viewing, tap the three dot menu in Chrome. Go to Save and share, then Save as. In the file folder pop-up window, click Save or rename the webpage, then Save. This downloads the webpage to your computer or device. When you want to view it offline, go into the folder (downloads by default) where you saved the webpage and tap the one you want.
Do websites know if I’ve pinned their pages?
Although websites can and do collect data when you visit their pages, they do not have direct access to your bookmarks. This means they can’t view or do anything to your saved bookmarks.
What is social bookmarking?
Instead of storing all your bookmarks in your web browser, where you access them via the Bookmark Manager, social bookmarking requires you to pin a website, usually for free. Pinning your favorite web pages this way allows you to return to the page whenever you want. One of the most popular social pinning websites is Pinterest. While this method of saving websites brings the advantage of visual representation with topic-related images, you can only view these when you’re online.
How do I share bookmarks?
The easiest way to share your bookmarks is by exporting the lot. The downside is whoever you’re sharing your bookmarks with will have to go through all of your bookmarks to get to the one(s) you wanted to share. To export your bookmarks, go into your Bookmark Manager and tap the three dot menu, Export bookmarks. Name the file and hit Save. The person you’re sharing with will have to import your bookmarks to access them. If you only want to share one or a handful of bookmarks, an easier way to copy and paste the URLs (webpage address) into an email or chat. You can right-click on any single bookmark while in Bookmarks Manager, select Copy then paste it to an email or chat. If you have a group of bookmarks together that you’d like to share, hold down the Ctrl and Shift keys simultaneously while you tap the bookmarks you want to share. Copy and paste the group.
Note: Windows 11 makes sharing easy when you’re viewing a webpage. Click the three dot menu, tap Save and share, and select an option: copy link (to paste in an app like email or chart), send to your devices (so you can access it from another computer or mobile device), create a QR code (someone has to scan the QR code in order to access the shared webpage), or Cast (view the shared webpage on a smart TV or smart speaker).
Pin Your Favorites to Your OneLaunch Dock
Using OneLaunch, a free alternative to Windows desktops, you can effortlessly maintain your bookmarks by keeping all bookmarks in one place. OneLaunch pins top sites to your dock. It’s kind of like adding your bookmarks’ greatest hits to your dashboard. Check out this quick video on how and why you may want to do that.
Once you’ve tidied up your bookmarks in your main browser and opened OneLaunch, the program will import those bookmarks into OneLaunch and create a bookmarks bar similar to that of Chrome, so your browsing experience feels like home.
To view your saved bookmarks or folders in the Bookmarks bar, click on the one(s) you want to view, and OneLaunch will open them. You can also delete webpages or folders from the bookmarks bar or the three-dot menu in the upper right, as we described above for Chrome users.
OneLaunch has an even easier way to manage your bookmarks: the Bookmarks app. To pin this app to your dock, tap the plus sign and click the red flag Bookmarks icon in the Apps section.
The Bookmarks app will now be available on the dock along with your bookmark collection(s). Anytime you want to manage your bookmarks, tap the red flag icon in the OneLaunch dock and select a bookmark or folder. From here you can pin favorites individually to the OneLaunch dock where you can access them with one click. You can view up to 19 of them in the dock. After that, anymore will go into an overage area (the plus sign). You can unpin your favorites, show labels to help identify the bookmarks, or unpin if you no longer want them on the dock. You can rearrange your bookmarks by dragging their icons to where you want them. Managing options within the Bookmarks app, include editing or deleting a bookmark with a right-click of your mouse. Plus, you can rearrange your bookmarks like you can on the OneLaunch dock.
We have designed a seamless sync between the OneLaunch dashboard and the OneLaunch Chromium browser that allows you to add bookmarks in one area, and they’ll automatically update in the other. However, if you continue to use your older browser, something other than Chromium (Chrome, Firefox, Microsoft Edge, for example), when you add bookmarks to that browser, you’ll need to add them to Chromium or OneLaunch too.
Like cleaning out your clothes closets, your bookmarks need a bit of TLC. Purging forgotten ones and putting “must-haves” in order will make your online browsing and your next overhaul easier.


 Share On Twitter